El Nido is one of the most photographed destinations in Southeast Asia — and with good reason. The karst limestone formations, emerald lagoons, and hidden beaches create compositions that exist nowhere else. But great El Nido photos require knowing where to position yourself, when the light is right, and what equipment to bring on tour boats. This guide covers the 13 best spots, optimal times, and practical photography tips.

Table of Contents
- Best Photo Spots by Category
- Lagoon Shots (Tour A)
- Tour C Photo Spots
- Land-Based Photo Spots
- Additional Spots Worth Shooting
- Golden Hour Timing in El Nido
- Drone Photography: Rules and Best Practices
- Gear Guide for El Nido
- Photography Tips for Tour Boats
- Frequently Asked Questions
- Plan Your Photography Trip
Best Photo Spots by Category
Lagoon Shots (Tour A)
1. Big Lagoon — Best Dramatic Wide Shot
Big Lagoon’s dark limestone walls against crystal-clear water create El Nido’s most photogenic colour contrast. The 80 m walls turn amber in morning light.
- Best shot: From a kayak at the far end of the lagoon looking back toward the entrance — the canyon walls frame the sky above. Position the kayak low in the frame
- Best time: 9:30-10:30 AM when the sun enters the lagoon mouth and illuminates the green water. Avoid midday flat light
- Composition tip: Include a kayaker in the foreground for scale — the walls alone look like a painting; the human reference makes the scale comprehensible
- Crowd management: In peak season, 8+ boats arrive between 10 AM-12 PM. Book the 9 AM tour departure to reach the lagoon first and get 20-30 minutes before other boats arrive
2. Small Lagoon Entrance — Most Iconic Single Image
The swim-through passage to Small Lagoon — a 2 m gap in the limestone with a kayak or swimmer framed in vivid turquoise — is El Nido’s most-replicated image.
- Best shot: Position yourself in the water just inside the lagoon, facing outward toward the passage opening. Have your subject swim through — their silhouette against the brighter outer water creates the classic frame
- Alternative: From outside, shoot through the gap into the interior — the turquoise glow looks other-worldly
- Equipment: Waterproof camera or housing essential; GoPro wide-angle works well here
- Best time: 10-11 AM when sun is high enough to illuminate the interior turquoise
3. Secret Lagoon Interior — Peaceful and Unique
The enclosed beach inside Secret Lagoon — accessed through a crack in the rock — has a quality of light that feels separate from the outside world. Water reflects off white sand; the rock walls create even diffused light without direct shadows.
- Best shot: Wide angle from the back of the enclosed beach toward the rock opening — the exit framing creates a natural portrait or landscape
- Best time: Any time the sun is overhead (11 AM-1 PM); the diffused reflected light inside the cove is flattering in all directions
- Crowd tip: Secret Lagoon gets crowded fast. Be the first off the boat and through the crack for empty-cove shots
Tour C Photo Spots
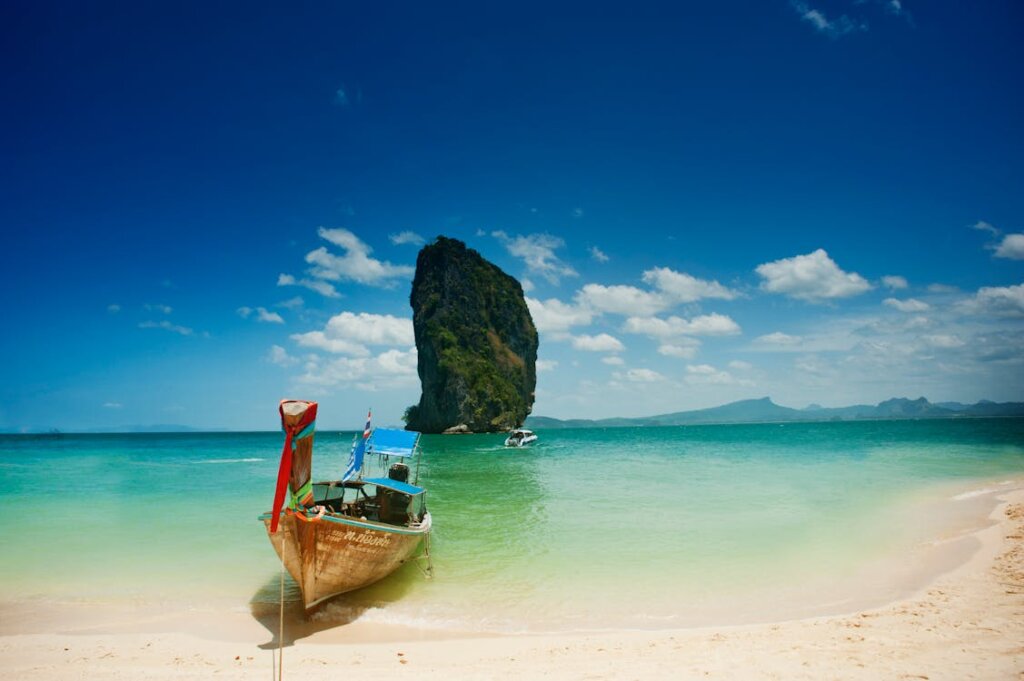
4. Helicopter Island Cliff Silhouette — Most Dramatic
Helicopter Island’s distinctive limestone silhouette — the shape that gives it its name when viewed from the air — is best captured at golden hour when the cliff face turns amber against a blue sky and turquoise water.
- Best shot: From the water looking up at the cliff face with a diver or swimmer in the foreground during late afternoon golden hour
- Cliff jump photo: Have a friend photograph from the water below — shoot in burst mode; capture at the apex of the jump when the jumper is silhouetted against the sky
- Best time: 3:30-5:00 PM on the return leg (Tour C boat arrives back at Helicopter Island area in late afternoon on some routes)
- White sand strip: Only visible at low tide; check tide tables and plan accordingly — the strip disappears completely at high tide
5. Hidden Beach Cove Interior — Secret Paradise Shot
Once inside the enclosed cove of Hidden Beach, the photograph practically takes itself — white sand, vivid turquoise water, vertical limestone walls on all sides, no exit visible. The challenge is getting the shot before the crowd of other tour visitors fills the frame.
- Best shot: From the far end of the cove looking back toward the limestone walls — frame the ceiling of rock against the slice of sky above. No horizon visible; entirely enclosed
- Solo cove shot: Arrive early in the cove and position yourself quickly. Ask other visitors to move temporarily or work around them; the cove is small
- Underwater: The swim-through passage entry from outside is photogenic — light filters through the 3 m underwater tunnel. GoPro or underwater camera needed
6. Matinloc Shrine Panorama — Best Viewpoint
The 60-step staircase to Matinloc Shrine leads to the single best viewpoint available from any Tour C stop — a 270-degree panorama of the western Bacuit Bay archipelago stretching to the horizon.
- Best shot: Wide angle from the top platform looking west — include the shrine in the right-third and the archipelago stretching left. Use a polarising filter if you have one to cut glare
- Best time: The platform faces west — afternoon light (2-4 PM) is ideal. Morning creates harsh backlight against the sea
- Drone opportunity: Matinloc is one of the few Tour C stops where drone use is logistically feasible (open ground, not over a crowded boat). See drone rules below
Land-Based Photo Spots
7. Nacpan Beach Twin Arcs — Best Sunrise Location
Nacpan Beach’s twin-arc formation — two 2 km sweeps of white sand separated by a rocky headland — is El Nido’s finest landscape photography subject. The full composition is only visible from the headland viewpoint.
- Best shot: Hike the 15-minute trail to the elevated viewpoint at the headland between the two arcs. At sunrise, both beaches are lit from the east; the coconut palms and lagoon water create a perfect foreground
- Best time: Sunrise (5:45-6:30 AM March-April; 5:30-6:15 AM November-December). Arrive at the trailhead by 5:15 AM
- Alternative perspective: Walk the full length of the northern arc at low tide for reflections in the wet sand at golden hour
- Drone: The twin arc aerial view is one of El Nido’s most recognisable drone shots. Best at sunrise before wind builds. See drone rules below
8. Taraw Cliff Viewpoint — Best Aerial-Style Town Shot
The 300 m climb to Taraw Cliff above El Nido Town delivers the closest thing to an aerial view without a drone — the full sweep of Bacuit Bay, El Nido Town below, and the karst island chain to the horizon.
- Best shot: Include the town roof tiles in the lower quarter of the frame with the bay and islands behind — the rooftops provide colour and scale against the natural backdrop
- Best time: Early morning (7-8 AM) before haze builds; sunset (5-6 PM) for golden light on the limestone — but the trail is risky in low light so plan the descent carefully
- Equipment: A wide-angle lens (24 mm equivalent or wider) captures the full panoramic sweep. Telephoto for compressing the island layers into a single frame
9. Las Cabanas Beach Sunset + Zipline
Las Cabanas is El Nido’s most accessible sunset photography location — 10 minutes from town by tricycle, with direct sightlines to the karst islands of Bacuit Bay as they turn amber in the last light.
- Best shot: Position on the beach facing west; include silhouetted palm trees in the foreground and the island chain in the background. Magic hour lasts 15-20 minutes
- Zipline action shot: Have someone photograph from the beach below while another person rides the zipline; use burst mode and capture mid-arc when the subject is framed against the sea
- Best time: 30 minutes before to 15 minutes after sunset (approximately 5:30-6:15 PM year-round)
10. Nagkalit-Kalit Falls
The jungle waterfall context makes Nagkalit-Kalit a different kind of El Nido photo — lush green, soft diffused light, rushing water rather than turquoise sea.
- Best shot: Long exposure (1/15 to 1/4 second) for silky water; use a ND filter or shoot at sunrise when ambient light is low. A tripod is impractical on the jungle trail — stabilise on a rock
- Best time: Morning when diffused canopy light creates even, shadow-free illumination. Avoid midday harsh shafts
- Wet season advantage: Falls volume dramatically higher; more dramatic shots; lush green surroundings
Additional Spots Worth Shooting
- Snake Island sandbar (Tour B): The narrow sand tongue connecting two islands at low tide is a compelling overhead/elevated shot. Climb the rocky hillside at one end for the classic angle
- Corong-Corong sunset beach: More natural and less crowded than Las Cabanas; good for romantic golden-hour portraits with the islands behind
- El Nido Town at night: The parol lanterns during Balinsasayaw Festival (late November-December) and Christmas are unique cultural photography subjects; use a tripod for clean night exposures
Golden Hour Timing in El Nido
| Month | Sunrise | Sunset | Photography Notes |
|---|---|---|---|
| November-December | 5:30-5:50 AM | 5:30-5:45 PM | Short golden hours; dramatic clouds post-wet-season |
| January-February | 6:00-6:10 AM | 5:50-6:00 PM | Clear skies; excellent visibility; manta season |
| March-April | 5:45-5:50 AM | 6:00-6:10 PM | Best overall: long golden hours, clear skies, peak visibility |
| May | 5:30-5:35 AM | 6:00-6:10 PM | Hotter; some afternoon haze; long evenings |
Drone Photography: Rules and Best Practices
Drone photography in El Nido is legally complex. Bacuit Bay is a protected marine area and El Nido is subject to Philippines Civil Aviation Authority rules on drone use.
- Registration required: All drones over 250 g must be registered with the Philippines CAAP and carry proof of registration
- Protected areas: Flying directly over Bacuit Bay marine sanctuary stops (lagoons, hidden beaches) is technically subject to DENR permits. In practice, enforcement varies; use judgment and respect local staff directives
- Best legal locations for drone: Nacpan Beach (mainland, less regulated), Taraw Cliff approach (above town), Las Cabanas/Corong-Corong areas
- Early morning advantage: Wind is calmest 5:30-8:00 AM; better stability and less risk to marine life from downwash
- Practical reality: Drones are widely used by visitors and tour operators in El Nido. No active ban is enforced as of 2026, but always ask local guides before launching over specific protected stops
Gear Guide for El Nido
| Gear | Priority | Why |
|---|---|---|
| Waterproof case or housing | Essential | Tour boats are wet; lagoon swim-throughs require underwater capability |
| Wide-angle lens (16-24 mm) | Essential | Lagoon walls, panoramas, and enclosed coves all require wide coverage |
| Polarising filter | Highly recommended | Cuts water glare; makes the turquoise colour saturate vs wash out |
| Dry bag | Essential | Protect all gear between wet stops |
| Power bank | Essential | No charging on tour boats; 8-hour days drain batteries |
| GoPro or action camera | Useful | Best tool for swim-throughs and underwater passage shots |
| Drone (DJI Mini 4 or similar) | Optional | Nacpan and Taraw Cliff aerial shots are extraordinary; see rules above |
Photography Tips for Tour Boats
- Shoot from the bow: The front of tour bancas gives the cleanest angle with the islands ahead and no other passengers in frame. Ask politely to use the bow — most guides will accommodate photographers
- Protect gear during boat transitions: Keep cameras in a dry bag between stops; spray is common even in calm conditions
- The crossing IS the shot: The open-water crossing to Tour C stops with karst islands growing on the horizon is often the most dramatic image of the day — shoot it rather than waiting for the “stop”
- Shoot vertically for stories/reels: All the lagoon entrances and cliff formations lend themselves to vertical framing; shoot both orientations at each location
- Magic light on return: Tour C boats return roughly 4-5 PM when the afternoon sun turns the limestone amber. The return journey often has better light than the morning arrival at stops
Frequently Asked Questions
Can you take photos inside the lagoons?
Yes — photography is permitted at all island-hopping tour stops including inside the lagoons. Drone use inside the lagoons is more restricted (confined space + protected area) — fly outside and use a kayak or zoom lens for lagoon interior shots instead.
What is the best camera for El Nido?
For most travellers: a waterproof mirrorless camera (Sony ZV-E10, Olympus TG-7) or smartphone in a waterproof case plus a GoPro for underwater/action. For serious photographers: a full-frame mirrorless (Sony A7, Nikon Z series) in a waterproof housing with a wide prime is the optimal setup. The biggest upgrade is always the lens and the light timing — not the camera body.
Is El Nido good for drone photography?
Excellent for specific locations: Nacpan Beach twin arcs, Taraw Cliff, and Corong-Corong sunsets are world-class drone subjects. More complicated over the protected marine areas (lagoon stops). Register your drone with CAAP Philippines before arrival, fly at sunrise for best light and minimal wind, and ask guides before launching at any tour stop.
Plan Your Photography Trip
For the best photography conditions: visit February-April (peak visibility, golden hour timing, lowest crowds relative to dry season). Plan your tour schedule to capture Nacpan Beach at sunrise on a land day, Tour C for afternoon light on the cliffs, and Tour A early morning for the emptiest lagoon shots. Full planning: 7-day itinerary · best time to visit · February guide
| Platform | Best For | El Nido Deals |
|---|---|---|
| Booking.com | Hotels, resorts, free cancellation | View deals → |
| Agoda | Best Asia prices, loyalty rewards | View deals → |
| Klook | Tours & activities | Browse tours → |