El Nido Instagram Spots 2026: Best Photo Locations & When to Visit Each
El Nido generates more social media content per square kilometre than almost anywhere in Southeast Asia — the challenge isn’t finding a photogenic spot, it’s finding the right angle, at the right time, without 40 other photographers in the frame. This 2026 guide covers the most iconic photo locations, the optimal timing for each, and practical tips for getting the shot without the crowd.
- The Top 10 El Nido Instagram Spots
- 1. Big Lagoon — Kayak Interior Shot
- 2. Nacpan Twin-Beach Sand Spit
- 3. Taraw Cliff Summit — Sunrise Panorama
- 4. Small Lagoon Rock Passage Swim-Through
- 5. Hidden Beach Rock Tunnel Entry
- 6. Matinloc Shrine Clifftop
- 7. Las Cabañas Beach Sunset
- 8. Helicopter Island Aerial Profile
- 9. El Nido Town Colourful Street Life
- 10. Bioluminescent Night Swim
- General Instagram Tips for El Nido
The Top 10 El Nido Instagram Spots
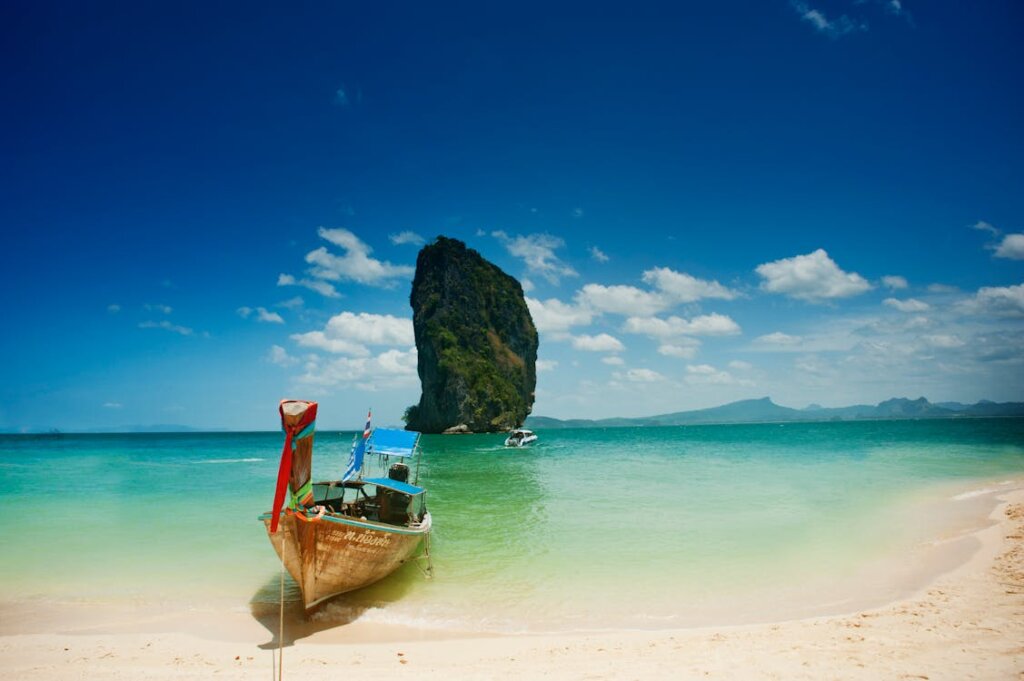
1. Big Lagoon — Kayak Interior Shot
Best time: 7:00–8:00 AM | Access: Tour A or C
The classic El Nido image: a kayak floating in jade-green water enclosed by sheer limestone walls. To get it crowd-free, take the earliest possible tour departure (7 AM) and sprint your kayak to the lagoon’s deepest interior before other boats arrive. Compose with the karst walls framing both sides and water filling the foreground. Use a wide-angle lens (16–24mm) and expose for the water (not the bright sky above the cliffs).
2. Nacpan Twin-Beach Sand Spit
Best time: 1–2 hours after low tide | Access: Tricycle/motorbike from town
When the tide drops, a narrow white sand spit emerges connecting Nacpan and Calitang beaches — from slightly elevated ground at either end, you shoot the spit as a perfect arc dividing two different shades of blue. Check the El Nido tide chart before going. Shoot from a small rise at the Nacpan end; bring a zoom lens (70–200mm) to compress the spit’s perspective dramatically.
3. Taraw Cliff Summit — Sunrise Panorama
Best time: 5:30–6:30 AM | Access: Guided hike (₱600, depart 4:30 AM)
The view from Taraw’s 270m summit at sunrise is El Nido’s most dramatic and most rarely photographed shot — golden light flooding Bacuit Bay, islands emerging from mist, the town still sleeping below. Almost no other hikers are present at this hour. See our hiking guide for the route. Bring a tripod for long exposures if arriving before dawn.
4. Small Lagoon Rock Passage Swim-Through
Best time: 7:30–9:00 AM | Access: Tour A or C kayak
The narrow rock passage into the Small Lagoon, with water visible through it and reflected light playing on the walls, is a compelling architectural shot. Have a companion photograph you swimming through from inside the lagoon — the silhouette of a swimmer in the passage with blue water beyond is one of El Nido’s most striking human-scale images. The reflected ambient light inside makes flash unnecessary.
5. Hidden Beach Rock Tunnel Entry
Best time: 9:00–11:00 AM (light angle optimal) | Access: Tour B swim-through
Photograph the moment of emerging from the rock tunnel into the enclosed secret beach — the tunnel frames the shot naturally with the turquoise cove visible beyond. Position your photographer inside the beach; you swim out and back repeatedly until the shot is right. An action waterproof camera or a companion with a housed DSLR gets the best results.
6. Matinloc Shrine Clifftop
Best time: 9:00–10:30 AM | Access: Tour D
The ruined shrine on the cliff edge with the Bacuit Archipelago spreading behind — frame the shrine archway or steps in the foreground with the island-studded sea behind. Tour D typically arrives here around 9:30 AM; get there before the next boat. A slightly elevated position (climb two steps above the main shrine level) opens up the sea perspective dramatically.
7. Las Cabañas Beach Sunset
Best time: 5:30–6:15 PM | Access: Tricycle (₱100–₱150)
El Nido’s most accessible sunset shot — the sun drops directly over the sea with the Las Cabañas cable car providing a human element. Shoot from the beach facing west; include the cable car gondola in the frame if it’s running. The fire show that follows (around 6:30 PM) provides dramatic long-exposure opportunities. Arrive by 5 PM for a good position.
8. Helicopter Island Aerial Profile
Best time: 9:00–11:00 AM | Access: Tour C (if you have a drone — see CAAP rules)
The island gets its name from its aerial silhouette. From the water level (boat perspective looking along the island’s length), the distinctive shape is recognisable. From above with a drone (registered with CAAP — see our drone guide), the helicopter profile is unmistakable. Water-level shot: use a long zoom from the bangka to compress the island’s shape.
9. El Nido Town Colourful Street Life
Best time: 6:00–8:00 AM | Access: Walk from anywhere in town
The back streets behind Real Street at dawn — fishing boat repairs, laundry on lines, women selling vegetables, children heading to school — are authentically colourful. A 35mm or 50mm prime lens captures the tight alley atmosphere. Ask permission before photographing individuals; most El Nideños are happy to be photographed if you show the photo afterwards.
10. Bioluminescent Night Swim
Best time: 8:00–10:00 PM (new moon period) | Access: Night tour (₱800–₱1,500)
The most technically challenging and most magical El Nido shot — glowing blue bioluminescent plankton activated by movement. Requires: a waterproof camera, ISO 3200–6400, 5–15 second exposure, and complete darkness (no boat lights for 10 minutes prior). The resulting images of glowing blue water trails are unlike anything else. New moon nights provide the darkest conditions. For full technique details see our photography tips guide.
General Instagram Tips for El Nido
- 7 AM is magic hour for lagoons — every hour later exponentially multiplies the boat traffic in frame
- Vertical format works better than landscape for karst cliff compositions — the height of the limestone is the drama
- Include a human element — the scale of El Nido’s geology only reads on social media when there’s a person for reference
- Reef-safe sunscreen only — chemical sunscreen leaves an oil slick in lagoon water that ruins water shots and damages the ecosystem
- Dry bag your gear — bangka spray and sudden rain are constants; protect everything in a waterproof case
For full camera and drone guidance see our photography tips guide and drone photography guide. For reaching each spot, our island hopping tips and transport guide cover logistics. The Instagram Creators travel photography guide and National Geographic travel photography tips provide broader compositional context.