
TL;DR: For time-lapses in El Nido, shoot sunsets at Las Cabanas or Corong-Corong, morning boat departures from the town beach, and sunset-to-stars at Lio; use 2–5 second intervals and protect your gear from humidity and salt spray.
El Nido is one of the most photographed places in the Philippines, but most images capture a single frozen moment. Time-lapse shows what still photos miss: tour boats fanning out across Bacuit Bay, cloud shadows racing over Nacpan’s sand, and the sky turning from gold to violet behind the limestone islands.
This guide focuses on time-lapse photography specifically for travelers shooting with a camera, phone or action cam on a normal El Nido holiday, not for professional production crews. Our unique angle is motion: every spot below was chosen for what actually moves in the frame, because a beautiful view with nothing changing makes a dull time-lapse.
Why El Nido Works So Well for Time-Lapse
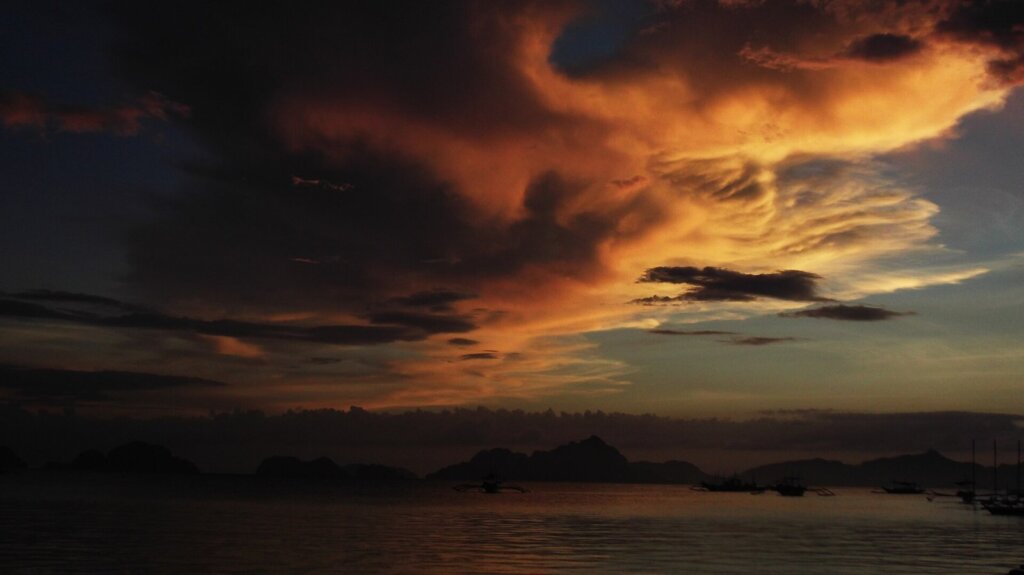
Three things make El Nido a natural time-lapse destination. First, the west-facing coastline around Corong-Corong, Las Cabanas and Marimegmeg offers clean sunset horizons dotted with island silhouettes. Second, there is constant motion on the water: outrigger bangkas leave in the morning and return in late afternoon, giving foreground action. Third, tropical clouds build and dissolve quickly, which looks dramatic when compressed. For still photography basics, see our El Nido photography tips, and for golden-hour planning read the sunrise and sunset photography guide.
The 8 Best Time-Lapse Spots in El Nido
The list below runs roughly from the most popular sunset locations to quieter options further from town. Most are reachable by tricycle in under 30 minutes from the center, while Nacpan and Lio need more travel time, so pair them with other activities in the north.
1. Las Cabanas Beach
Best time: Sunset. What moves: Sun dropping behind Bacuit Bay islands, silhouettes of swimmers. Arrive 60–90 minutes early to claim a spot on the rocks at the southern end. Use a 3–5 second interval and let the sequence run 30 minutes past sunset to catch the afterglow.
2. Corong-Corong Bayfront
Best time: Sunset to blue hour. What moves: Outrigger boats returning, island silhouettes, bar lights switching on. A low tripod on the sand gives foreground boats; the transition from golden sky to warm restaurant lights makes a natural day-to-night sequence.
3. El Nido Town Beach
Best time: Sunrise and morning boat departures. What moves: Dozens of bangkas heading out with Cadlao Island behind. Shoot from the northern end around 8–9am to capture tour boats fanning out across the bay; a 1–2 second interval keeps boat motion smooth.
4. Taraw Cliff Viewpoint
Best time: Morning. What moves: Town rooftops, the bay and Cadlao from above. The guided climb is steep and sharp, so tripods are rarely practical. Use a phone hyperlapse or a mini tripod clamped safely, and always follow the guide.
5. El Nido Canopy Walk
Best time: Late afternoon. What moves: Hanging bridges and limestone with town and bay views. A short, easier alternative to Taraw. Walk the route first, then choose a stable platform where you will not block other visitors.
6. Nacpan and Calitang Viewpoint
Best time: Early morning. What moves: The twin beaches and shifting cloud shadows. Hike up before the heat; cloud shadows racing across the sand look spectacular at a 5–10 second interval.
7. Marimegmeg Beach
Best time: Sunset. What moves: Wide open horizon with Bacuit Bay islands. Less crowded than Las Cabanas on some evenings; a wide lens captures the full arc of the sky.
8. Lio Beach
Best time: Sunset and night sky. What moves: Planned beachfront with low light pollution further along. Good for a holy-grail sunset-to-stars sequence when skies are clear; walk away from lit areas for the night section.
Spot Comparison at a Glance
| Spot | Best time | Tripod friendly | Crowd level |
|---|---|---|---|
| Las Cabanas Beach | Sunset | Yes | High |
| Corong-Corong Bayfront | Sunset to blue hour | Yes | Medium |
| El Nido Town Beach | Morning departures | Yes | Medium |
| Taraw Cliff | Morning | No (handheld hyperlapse) | Low to medium |
| Canopy Walk | Late afternoon | Limited | Medium |
| Nacpan Viewpoint | Early morning | Yes | Low |
| Marimegmeg Beach | Sunset | Yes | Medium |
| Lio Beach | Sunset to stars | Yes | Low |
Camera Settings and Intervals That Work
A good rule is to match the interval to the speed of what moves. Fast boats and people: 1 to 2 seconds. Clouds and sunsets: 3 to 5 seconds. Stars and the night sky: 15 to 30 seconds with long exposures. Aim for at least 250 to 300 frames for ten seconds of video at 25 to 30 frames per second.
- Manual everything: lock focus, white balance and, in daylight, exposure to avoid flicker.
- Sunset transitions: use aperture priority with exposure smoothing, or adjust ISO gradually, a technique known as the holy grail.
- Shutter drag: an ND filter lets you use slower shutters in daylight, adding natural motion blur to water and boats.
- Phones: built-in time-lapse and hyperlapse modes are excellent; mount the phone on a mini tripod and turn on airplane mode to avoid interruptions.
For background on the technique, the time-lapse photography entry on Wikipedia is a solid primer.
Editing and Exporting Your Sequence
Shoot in RAW if your camera allows, then batch-edit the frames together so color and exposure stay consistent. Free and paid tools can deflicker sequences, which is especially helpful for sunset transitions where small exposure jumps become visible. Export at 4K if you shot in high resolution, even if you will share in HD, because it gives you room to crop or add a slow digital pan. Keep clips short: eight to fifteen seconds is usually enough to hold attention on social media, and a few strong sequences edited together will tell the story of your trip better than one long clip.
Protecting Gear From Humidity, Salt and Sand
El Nido’s air is warm and humid, and lenses fog instantly when you step out of an air-conditioned room. Leave your camera bag outside or in a non-air-conditioned area for 20 to 30 minutes before shooting. Salt spray builds a film on lenses at beach spots, so carry a microfiber cloth and lens pen. Keep silica gel packs in your bag, and use a dry bag on boats. A long time-lapse also drains batteries quickly in the heat, so bring spares or a power bank with a dummy battery adapter. Our guide to power plugs and charging in El Nido explains what adapters to pack.
Timing by Season and Weather
The dry season, roughly November to May, brings the clearest sunsets and the best night skies, while the shoulder months often deliver dramatic cloud formations that are perfect for time-lapse. During the southwest monsoon from about June to October, expect fast-changing skies and occasional heavy rain; protect gear with a rain cover and check forecasts from PAGASA. For night sequences, check the moon phase and follow our El Nido stargazing guide.
A Simple Time-Lapse Day Plan
If you want to collect several sequences in a single day, try this rhythm. Start at the El Nido town beach around 8am to capture tour boats heading out, then walk the Canopy Walk or climb Taraw Cliff for a morning hyperlapse while the light is still soft. Rest through the harsh midday hours, charge batteries and back up your cards. In late afternoon, take a tricycle to Las Cabanas or Corong-Corong, set up at least an hour before sunset, and let the camera run well into blue hour. On a clear night, finish with a sunset-to-stars sequence at Lio or a dark stretch of beach. That plan yields four distinct clips with very little wasted time.
Drone Rules and Etiquette
Aerial hyperlapses look incredible, but drones are regulated in the Philippines and restricted in parts of the protected area and near Lio Airport. Read our El Nido drone photography rules and check national guidance from the Civil Aviation Authority of the Philippines before you fly. On the ground, keep tripods out of walkways, do not block other people’s views for an hour at a time, and ask before including identifiable people up close in your frame.
Key Takeaways
- Las Cabanas and Corong-Corong are the most reliable sunset time-lapse spots.
- Match intervals to motion: 1–2s for boats, 3–5s for clouds, 15–30s for stars.
- Let gear acclimatize for 20–30 minutes to avoid lens fog from humidity.
- The dry season from November to May gives the clearest skies and night sequences.
- Check drone rules before flying, especially near Lio Airport and protected areas.
Frequently Asked Questions
Where is the best place for a sunset time-lapse in El Nido?
Las Cabanas Beach is the classic choice, with Corong-Corong and Marimegmeg as quieter alternatives with similar island silhouettes.
Can I bring a tripod on the Taraw Cliff climb?
It is generally impractical because the climb is steep and requires both hands. Use a phone hyperlapse or a small clamp-style mount only if your guide agrees.
What interval should I use for a sunset time-lapse?
Around 3 to 5 seconds works well for sunsets and clouds. Use shorter intervals for fast-moving boats and longer ones for stars.
Can I fly a drone for time-lapses in El Nido?
Drone use is regulated. Check national rules and local restrictions, especially near Lio Airport and inside protected areas, before flying.
How do I stop my lens fogging in El Nido?
Let your camera acclimatize outside air-conditioned rooms for 20 to 30 minutes and keep silica gel in your bag.
Final Thoughts
El Nido is made for time-lapse: moving boats, fast tropical skies and endless island silhouettes. Pick two or three spots from this list, plan around golden hour, protect your gear from the humidity, and you will come home with sequences that capture the bay far better than any single photo.
About the Author
This guide was compiled by the El Nido Hotels Ranking editorial team, with input from local operators and ongoing on-the-ground updates.